
Plywood Stretcher Bars for Artist Canvas
Building and stretching your own art canvas has some distinct advantages over the commercially available choices. The first and most obvious is size and format. Canvases can made to nearly any specification, the only limits being access to necessary the skills and resources. Another advantage is the quality of the materials and craftsmanship used in the construction. The best design will be sturdy enough to keep the canvas taught without sagging, yet light enough to facilitate hanging on a wall. The very edge of the frame needs to offer a minimum of surface in contact with the canvas so that the whole of the stretcher bar does not press against the back of the canvas.
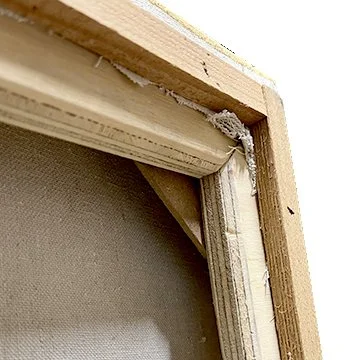
I chose a good shop grade 3/4” plywood for the rails. By cutting it into strips 1.75” wide and gluing 2 pieces perpendicular, the resultant piece becomes a rigid support beam. These can be made to length as needed and the ends mitered to make the desired rectangle. Use PVA glue and staple or pin nails to assemble into a frame. Reinforce the inside corners with scraps of anything thin, such as cardboard or bookboard or mdf. It is important with this design to chamfer or round the edges of the plywood for minimal contact where the canvas wraps around to the sides.
A variety of suitable canvas materials are available, the least expensive being ordinary hardware dropcloth from the paint store. Other choices can be found in fabric and sewing stores. Your choice may depend on the desired surface after final prep. Another factor is the fabric’s ability to stretch without tearing or sagging.
Place the canvas face down on the table with the frame on top, allowing adequate margins for wrapping and stapling the canvas to the frame. Start on one long side of the frame with just a couple of staples in the center of the bar, making sure the canvas is straight and even and that there is enough material to reach all around. Fasten the opposing side, gently pulling the canvas semi-tight before working around to the adjacent sides. It is helpful to use canvas pliers to grip the edges to avoid uneven tension. Gently work around the frame toward the corners, snugging and stapling the canvas to achieve a drum-tight appearance. Tuck the corners in, trimming and folding to minimize any bulges.
Finish by fastening 3/8” square trim on the back along the stapled edge of the canvas. This lets the canvas stand out from the wall just a bit.